Overview
In 2021 I started working on a rebranding project for a company that I was working for in 2020. Here is a link to the project. The company already had a nice website but they have been using that website since 2018 and they wanted something new and modern that is also easy to manage for non-developers. For this project to be a success I was working with a designer friend. We sat down and started planning how we were going to go about it because even if this was a company website it had a lot of moving parts so it needed some planning.
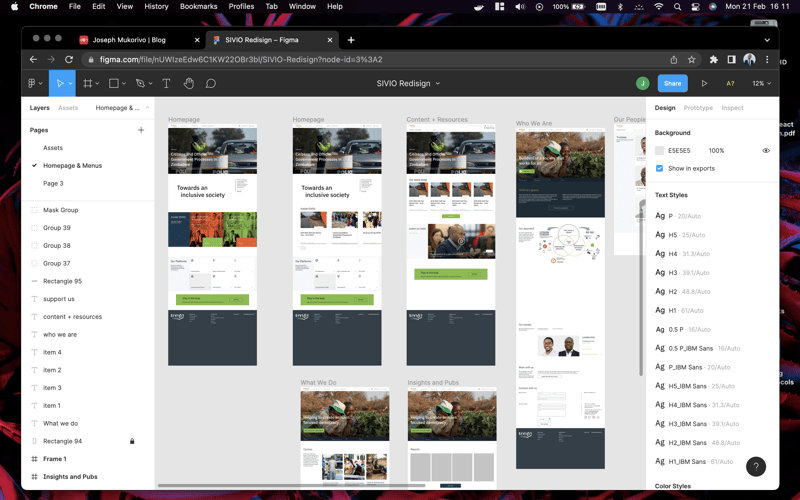
Figma Design

We used figma for every single component that we developed.
Homepage Design

Myself and my friend already had some experience with scrum for project management, so we decided to use scrum for this project since it was good fit, so we started to create a product backlog, prioritized features and divided the work into sprints. We were working very closely with the product owners to make sure that we were developing what the user really wanted.
Tech stack choice
So this was one of the interesting stages in the development of the project. We decided to use the JAMStack on this project for quite a number reasons. The design for the project was done using figma then I started the development of the UI using React for the UI. I decided to use tailwind css for styling because it makes it super fast to style components. I did not like the idea of having a bunch of classes on my markup so I used tailwind with css modules(I will show the snippets for some of the code). Because we wanted this website to be performant and SEO friendly I decided to use NextJS(The authors call it a React framework for production and they are right). NextJS has many features for performance and SEO out of the box like Server side rendering, Code splitting, optimized images, routing and many more. On this project it didn't make sense to spin up a custom api for the backend so I decided to use a modern CMS which in this case was strapi. All of the backend stuff on this site is coming from strapi.
There are also number of other tools I used but I will not go into the details of those. Below I will give a summary of key things I used.
Key things used in the project
React for the UI
NextJS for SSR/CSR/Routing and more
Tailwindcss for UI styling
Strapi as CMS
Docker for application containerization
nginx as a web server and reverse proxy
git for version control
mailchimp for managing a mailing list
Project Structure
For project structure I followed this structure with some improvements but was good as a starting point. Here is a high level overview.
Creating components
I tried to make the components that I developed reusable, Below are sample files for the Text component.
Text.css
.root {
  @apply mb-4;
}
.root:is(h1, h2, h3, h4, h5, h6) {
    @apply mb-7 2xl:mb-10 leading-tight dark:text-slate-200;
 }

.p {
  @apply text-lg 2xl:text-xl;
}
.span {
  @apply text-lg;
}

.h1 {
  @apply text-4xl md:text-5xl font-heading font-medium uppercase;
}

.h2 {
  @apply text-2xl md:text-4xl font-heading uppercase;
}

.h3 {
  @apply text-3xl;
}

.h4 {
  @apply text-2xl;
}

.h5 {
  @apply text-xl;
}

.h6 {
  @apply text-lg;
}
Text.tsx
import { FC, CSSProperties, ReactNode } from 'react';
import cn from 'classnames';

import s from './Text.module.scss';

type Variant = 'h1' | 'h2' | 'h3' | 'h4' | 'h5' | 'h6' | 'p' | 'span';

interface Props {
  as?: Variant;
  className?: string;
  style?: CSSProperties;
  children?: ReactNode | any;
  html?: string;
}

export const Text: FC<Props> = ({
  as: Tag = 'p',
  className = '',
  style = {},
  children,
  html,
  ...rest
}) => {
  const classes = cn(
    s.root,
    {
      [s.p]: Tag === 'p',
      [s.span]: Tag === 'span',
      [s.h1]: Tag === 'h1',
      [s.h2]: Tag === 'h2',
      [s.h3]: Tag === 'h3',
      [s.h4]: Tag === 'h4',
      [s.h5]: Tag === 'h5',
      [s.h6]: Tag === 'h6',
    },
    className // make sure to add the className last so it overwrites the other classes
  );

  const htmlProps = html
    ? {
        dangerouslySetInnerHTML: { __html: html },
      }
    : {};

  return (
    <Tag className={classes} {...rest} {...htmlProps}>
      {children}
    </Tag>
  );
};
Example Usage
<Text as='h1'>
 Hi 👋🏼, I’m Joseph. Writer, Software Engineer, DevOps
</Text>

<Text className='cool'>
This is a sample paragraph
</Text>
Hosting and deployment
The company I developed this website for is not a big company and they don't have a big tech team so I used the tools that I thought were easy for someone else to maintain. Strapi is running as a docker container using docker-compose, the frontend is also running in a similar way. In the source code for both strapi and the frontend I created some Make files to run the project. Below is a sample Makefile.
down:
    docker-compose down

build:
    docker-compose up -d --build

redeploy:
    git pull && make down && make build
In this case if there are changes to the source code, the user does not need to know how to use docker, they just run make redeploy in the root of the project and all the code pulling and image building is done for them, of course this is clearly labelled in the README.
So these services are running on different ports on the server and I exposed them using nginx. Below is how one may configure their nginx file for strapi. Please Note on production you have to make sure that you do it in a secure way this is just to help you get started.
server {
   server_name example.com www.example.com;

    location / {
        keepalive_timeout 64;
        proxy_pass http://localhost:8080; # use your local port where strapi is running
        proxy_http_version 1.1;
        proxy_set_header X-Forwarded-Host $host;
        proxy_set_header X-Forwarded-Server $host;
        proxy_set_header X-NginX-Proxy true;
        proxy_set_header X-Real-IP $remote_addr;
        proxy_set_header X-Forwarded-For $proxy_add_x_forwarded_for;
        proxy_set_header X-Forwarded-Proto $scheme;
        proxy_set_header Host $http_host;
        proxy_set_header Upgrade $http_upgrade;
        proxy_set_header Connection "upgrade";
        proxy_pass_request_headers on;
        proxy_max_temp_file_size 0;
        proxy_redirect off;
        proxy_read_timeout 240s;
    }

    listen 443 ssl; # managed by Certbot
    ssl_certificate /etc/letsencrypt/live/example.com/fullchain.pem; # managed by Certbot
    ssl_certificate_key /etc/letsencrypt/live/example.com/privkey.pem; # managed by Certbot
    include /etc/letsencrypt/options-ssl-nginx.conf; # managed by Certbot
    ssl_dhparam /etc/letsencrypt/ssl-dhparams.pem; # managed by Certbot


}
server {
    if ($host = www.example.com) {
        return 301 https://$host$request_uri;
    } # managed by Certbot


    if ($host = example.com) {
        return 301 https://$host$request_uri;
    } # managed by Certbot


   server_name example.com www.example.com;
    listen 80;
    return 404; # managed by Certbot
}
I hope this article helped you. P.S you can follow me on twitter.
Photo by Hal Gatewood on Unsplash
You may love these ones
Building Complexus: How I am Building a Modern Enterprise Frontend Architecture with Next.js and Turborepo
Building Complexus: How I am Building a Modern Enterprise Frontend Architecture with Next.js and Turborepo
Can One Person Really Build a Complex System from Scratch?
Can One Person Really Build a Complex System from Scratch?
Copyright © 2025 | All rights reserved.
Made with ❤️ in Zimbabwe🇿🇼 by Joseph Mukorivo.
